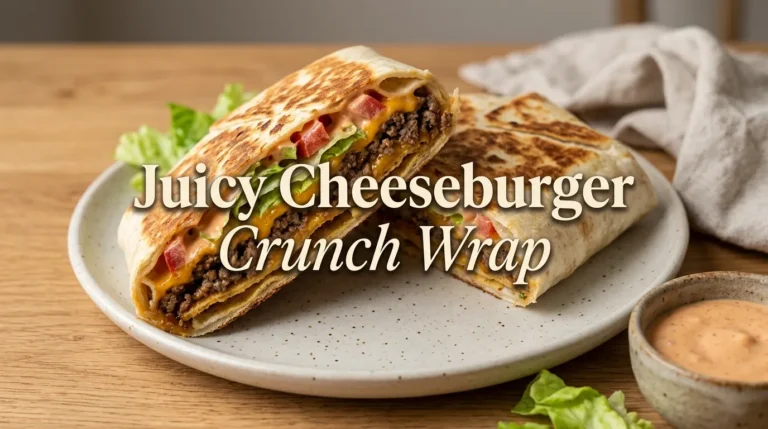
Crispy on the outside, cheesy in the middle, and packed with flavorful beef, these Cheesy Beef Crunchy Wraps are a delicious homemade meal that is hard to resist. Every bite combines juicy seasoned ground beef, melted cheese, fresh toppings, and a satisfying crunchy layer wrapped inside a golden tortilla.
This easy recipe is inspired by the popular fast-food crunchwrap, but it can be made right at home with simple ingredients. The beef is cooked with savory spices, layered with creamy cheese sauce, and combined with a crunchy tortilla chip or tostada for extra texture.
The best part is the contrast between the soft tortilla, crispy center, and rich beef filling. A quick toast in a skillet gives the outside a beautiful golden color while helping the cheese melt into the layers.
These homemade cheesy beef wraps are perfect for lunch, dinner, weekend treats, or a casual family gathering. They are easy to customize with favorite toppings, and the filling can be prepared ahead of time to make mealtime even simpler.
Why You Will Love These Cheesy Beef Crunchy Wraps
- Crispy and cheesy: A golden tortilla surrounds melted cheese, juicy beef, and a crunchy center.
- Full of flavor: Ground beef is seasoned with paprika, cumin, garlic, and other simple spices.
- Easy to customize: Add lettuce, tomatoes, sour cream, salsa, or your favorite sauce.
- Great for busy days: The beef filling can be prepared in advance for quick assembly.
- Budget-friendly: Everyday ingredients create a satisfying meal without complicated preparation.
- Family-friendly: Adjust the spice level and toppings to suit different tastes.
Ingredients
This recipe makes 4 large Cheesy Beef Crunchy Wraps.
For the Seasoned Beef
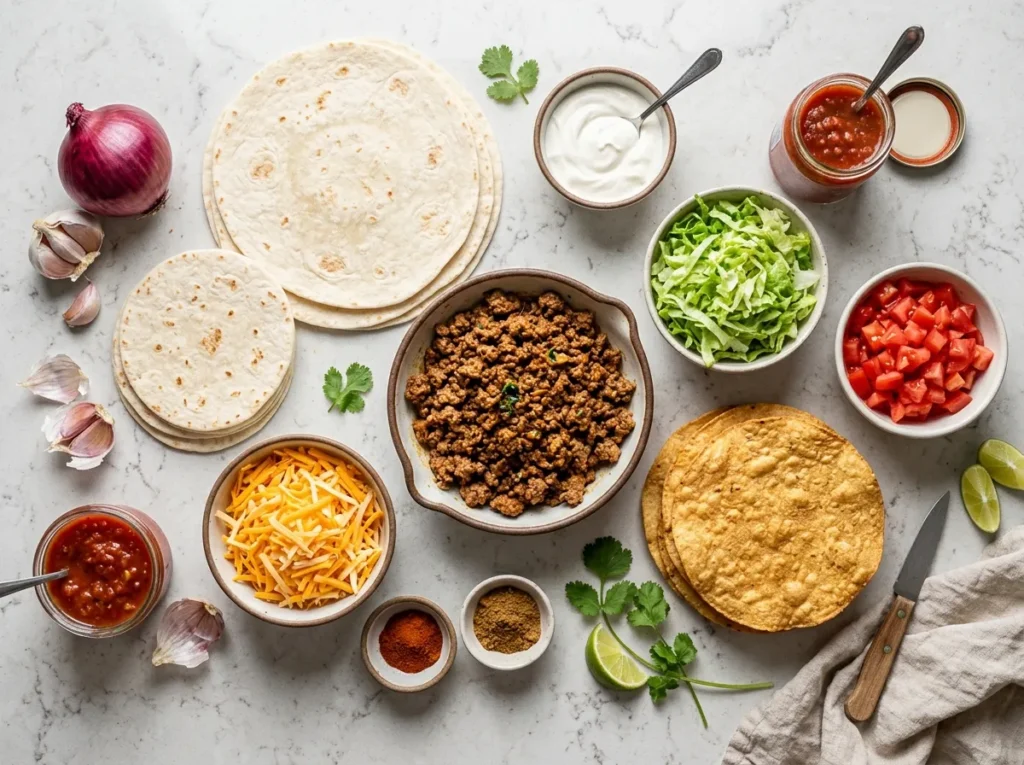
- 500 g (1.1 lb) ground beef
- 1 tablespoon olive oil or vegetable oil
- 1 small onion, finely chopped
- 2 garlic cloves, minced
- 1 teaspoon paprika
- 1 teaspoon ground cumin
- ½ teaspoon chili powder, optional
- ½ teaspoon ground black pepper
- ¾ teaspoon salt, or to taste
- 2 tablespoons water
For the Cheese Sauce
- 1 tablespoon butter
- 1 tablespoon all-purpose flour
- ¾ cup (180 ml) milk
- 1 cup (100 g) shredded cheddar cheese
- A pinch of salt, if needed
Shortcut option: Replace the homemade cheese sauce with approximately ¾ cup of prepared cheese sauce that meets your dietary requirements.
For the Wraps
- 4 large flour tortillas, approximately 10–12 inches each
- 4 small flour tortillas, approximately 6 inches each
- 4 round tostadas or a generous handful of sturdy tortilla chips
- 1 cup (100 g) shredded cheddar or mozzarella cheese
For the Fresh Filling
- 1 cup (50 g) shredded lettuce
- 1 medium tomato, diced
- ½ cup (120 g) sour cream
- ½ cup (120 g) salsa, optional
For Cooking
- 1–2 tablespoons vegetable oil, as needed
Ingredient note: Choose halal-certified ground beef and check packaged tortillas, cheese sauces, salsa, and seasonings for ingredients that do not meet your dietary requirements. Use alcohol-free flavorings and sauces where applicable.
Tools and Equipment
- Large frying pan
- Small saucepan
- Wooden spoon or spatula
- Whisk
- Cutting board
- Sharp knife
- Measuring cups and spoons
- Cheese grater, if using block cheese
- Wide nonstick skillet or griddle
- Large plate or clean work surface for assembly
How to Make Cheesy Beef Crunchy Wraps
These homemade wraps are assembled in layers, folded into a sealed package, and toasted until golden. Preparing the beef and cheese sauce first makes the assembly process much easier.
Step 1: Prepare the Ingredients
Finely chop the onion, mince the garlic, dice the tomato, and shred the lettuce.
If using block cheese, grate it before beginning. Keep the fresh toppings separate from the hot beef mixture so the lettuce stays crisp.
Arrange the tortillas, tostadas or tortilla chips, cheese, sour cream, and salsa near the cooking area for easy assembly.
Step 2: Cook the Beef
Heat 1 tablespoon of oil in a large frying pan over medium heat.
Add the chopped onion and cook for 3–4 minutes until softened. Stir in the minced garlic and cook for another 30 seconds.
Add the ground beef and break it into small pieces with a wooden spoon. Cook for approximately 6–8 minutes, stirring regularly, until browned and no pink remains.
Drain excess fat if necessary.
Step 3: Season the Beef
Add the paprika, cumin, chili powder if using, black pepper, and salt.
Pour in 2 tablespoons of water and stir well. Allow the mixture to simmer for 1–2 minutes so the spices coat the beef evenly.
The filling should be moist and flavorful but not watery. Remove the pan from the heat and set the beef aside.
For food safety, ground beef should reach an internal temperature of 160°F (71°C).
Step 4: Prepare the Cheese Sauce
Melt the butter in a small saucepan over medium-low heat.
Add the flour and whisk continuously for about 1 minute to form a smooth paste. This helps thicken the sauce without leaving a raw flour taste.
Gradually pour in the milk, whisking constantly to prevent lumps. Cook for 2–3 minutes until the mixture begins to thicken.
Reduce the heat to low and add the shredded cheddar cheese. Stir until melted and smooth.
Taste and add a small pinch of salt if needed. Remove from the heat.
Step 5: Warm the Tortillas
Warm the large and small tortillas briefly in a dry skillet or microwave according to the package directions.
Soft, flexible tortillas are much easier to fold without tearing. Keep them covered with a clean kitchen towel while assembling the wraps.
If using tortilla chips instead of tostadas, choose sturdy chips and arrange them in a compact layer to create the crunchy center.
Step 6: Start Assembling the Wraps
Place one large tortilla on a clean work surface.
Spoon approximately one-quarter of the seasoned beef into the center, leaving plenty of space around the edges for folding.
Drizzle some cheese sauce over the beef, then sprinkle with shredded cheddar or mozzarella.
Keep the filling concentrated in the middle rather than spreading it across the entire tortilla. This leaves enough room to fold the wrap securely.
Step 7: Add the Crunchy Layer
Place one round tostada on top of the beef and cheese.
If using tortilla chips, arrange a small handful in an even layer instead.
Spread approximately 2 tablespoons of sour cream over the crunchy layer. Add a little shredded lettuce, diced tomato, and salsa if desired.
The crunchy layer creates the signature texture, while the fresh toppings add a cool contrast to the warm beef.
Step 8: Cover with the Small Tortilla
Place one small tortilla over the fresh toppings.
This smaller tortilla acts as a cover, making it easier to fold the larger tortilla around the filling.
If the small tortilla is too large for the exposed filling, trim it slightly or use only enough filling to keep the wrap compact.
Step 9: Fold the Large Tortilla
Starting at one edge, fold a section of the large tortilla toward the center.
Continue folding around the tortilla in overlapping sections until the filling is enclosed in a compact, pleated package.
Turn the wrap seam-side down and press gently to help it hold its shape.
Repeat the process with the remaining ingredients to make four wraps.
Step 10: Toast Until Golden
Heat a wide nonstick skillet over medium-low heat and lightly brush it with oil.
Place one wrap seam-side down in the pan. Cook for approximately 2–3 minutes until the bottom becomes golden brown and crisp.
Carefully flip the wrap and cook the other side for another 2–3 minutes.
Press lightly with a spatula to help the folds seal. Avoid pressing too hard, as the filling may escape.
The tortilla should be crisp outside, with the cheese melted and the beef hot inside.
Step 11: Serve Warm
Transfer the cooked wrap to a cutting board and allow it to rest for 1–2 minutes.
Cut it in half with a sharp knife to reveal the layers of seasoned beef, creamy cheese, fresh toppings, and crunchy center.
Serve immediately with extra salsa, sour cream, or a fresh side salad.
Tips for Perfect Cheesy Beef Crunchy Wraps
Use Soft, Flexible Tortillas
Large flour tortillas are ideal because they fold easily around the filling. If the tortillas are cold or stiff, warm them briefly before assembly.
Avoid overfilling the wraps, as too much filling can cause the tortilla to tear.
Keep the Beef Filling Moist but Not Watery
A small amount of moisture helps the beef stay juicy, but excess liquid can make the tortilla soggy.
Simmer the beef until most of the water has evaporated. Drain excess fat before adding the remaining ingredients.
Do Not Skip the Crunchy Layer
The tostada or tortilla chips provide the signature crisp texture that makes these wraps special.
Add the crunchy layer during assembly rather than mixing it into the beef. This helps preserve its texture until the wrap is cooked.
Let the Cheese Sauce Thicken
A smooth, thick cheese sauce stays inside the wrap better than a thin sauce.
Add the milk gradually and stir continuously. Keep the heat low when adding cheese to help prevent a grainy texture.
Fold Carefully
The small tortilla helps cover the filling before the large tortilla is folded around it.
If the large tortilla is too small, use a slightly smaller amount of filling or choose a larger tortilla. A secure fold makes flipping much easier.
Toast Seam-Side Down First
Cooking the folded side first helps seal the wrap. Once the bottom is golden, flip gently using a wide spatula.
Cook over medium-low heat to allow the cheese to melt without burning the tortilla.
Easy Variations
Spicy Cheesy Beef Crunchy Wraps
Add extra chili powder, a pinch of cayenne pepper, or finely chopped jalapeños to the beef filling.
Serve with a cooling sour cream sauce to balance the heat.
Extra-Cheesy Crunchy Wraps
Add an extra sprinkle of cheddar or mozzarella between the beef and tostada layers.
For a stronger cheese flavor, use a combination of cheddar and mozzarella. Avoid adding so much cheese that the wrap becomes difficult to fold.
Beef and Bean Crunchy Wraps
Mix ½ cup of drained, rinsed black beans into the cooked beef.
The beans add texture and make the filling more substantial. If needed, add a small splash of water and simmer until the mixture is thick rather than wet.
Chicken Crunchy Wraps
Replace the ground beef with 500 g of ground chicken. Cook thoroughly until the chicken reaches an internal temperature of 165°F (74°C).
Season with the same spices and follow the remaining assembly instructions.
Vegetarian Crunchy Wraps
Replace the beef with a mixture of black beans, cooked lentils, and finely chopped mushrooms.
Cook the mixture with the onion, garlic, and spices until the mushrooms release their moisture and the filling becomes thick.
Homemade Garlic Sauce
For a simple alternative to sour cream, mix ½ cup plain yogurt with 1 small minced garlic clove, 1 teaspoon lemon juice, and a pinch of salt.
Stir until smooth and refrigerate until ready to serve.
Common Mistakes to Avoid
Overfilling the tortilla: Too much filling makes the wrap difficult to fold and can cause the seams to open. Keep the ingredients centered.
Using a watery filling: Excess liquid softens the tortilla and weakens the crunchy layer. Cook the beef until the mixture is thick.
Skipping the small tortilla: The smaller tortilla helps cover the filling and makes folding more secure. If unavailable, use a suitable piece of tortilla cut to size.
Cooking over high heat: High heat may burn the outside before the cheese melts. Use medium-low heat and cook patiently.
Adding lettuce too early to the hot beef: Fresh lettuce can wilt quickly. Add it over the crunchy layer, away from the hottest filling.
Flipping too soon: Give the first side enough time to develop a golden crust before turning the wrap.

Storage and Reheating
How to Store Leftovers
Allow cooked wraps to cool slightly, then refrigerate them in an airtight container within 2 hours of cooking.
Store in the refrigerator for up to 3–4 days. For the best texture, keep leftover lettuce, tomatoes, salsa, and sour cream separate whenever possible.
Fresh toppings may become watery during storage, so adding them after reheating is often the best option.
Can Cheesy Beef Crunchy Wraps Be Frozen?
Yes, but the texture is best when the wraps are frozen before adding fresh lettuce, tomatoes, and sour cream.
Prepare the beef and cheese filling, assemble the wraps with the crunchy layer, and fold them securely. Cool any cooked beef before assembly, and avoid leaving perishable ingredients at room temperature.
Wrap each assembled wrap tightly and freeze in a freezer-safe container for up to 2 months for best quality.
Thaw overnight in the refrigerator before reheating. The tostada may soften slightly during storage, but reheating in a skillet or air fryer can restore some crispness.
How to Reheat Crunchy Wraps
Skillet: Heat over medium-low heat for 3–4 minutes per side until the tortilla becomes crisp and the center is hot.
Air fryer: Heat at 350°F (175°C) for approximately 5–8 minutes, turning halfway through.
Oven: Place on a baking tray and heat at 350°F (175°C) for approximately 10–15 minutes.
Cooking times vary depending on the wrap’s thickness and starting temperature. Reheat leftovers to 165°F (74°C) for food safety.
A microwave can warm the filling quickly, but it may soften the tortilla and crunchy center. For the best texture, finish the wrap in a hot skillet after microwaving.
What to Serve with Cheesy Beef Crunchy Wraps
These wraps are satisfying on their own, but a few simple side dishes can turn them into a complete meal.
- Fresh green salad: Lettuce, cucumber, and tomato add freshness and balance the rich filling.
- Crispy potato wedges: Season with paprika, garlic powder, and black pepper.
- Corn salad: Combine sweet corn, chopped peppers, parsley, and lemon juice.
- Salsa: Serve a tomato-based salsa for a fresh, tangy contrast.
- Garlic yogurt sauce: A creamy, refreshing dip works well with the seasoned beef.
- Guacamole: Mashed avocado with lemon juice and a little salt adds a smooth, creamy texture.
For a casual family dinner, cut the wraps in half and arrange them on a platter with small bowls of sauces and fresh vegetables.
Frequently Asked Questions
1. What Makes a Crunchy Wrap Different from a Regular Wrap?
A crunchy wrap contains a crispy layer, usually a tostada or tortilla chips, inside a soft tortilla. The combination creates a contrast between the golden outside, tender beef filling, and crunchy center.
2. Can I Make Cheesy Beef Crunchy Wraps Without a Tostada?
Yes. Use sturdy tortilla chips arranged in a compact layer. Avoid thin, fragile chips that crumble too easily. The texture may differ slightly, but the wraps will still have a satisfying crunch.
3. Can I Use Store-Bought Cheese Sauce?
Absolutely. Prepared cheese sauce saves time and makes assembly easier. Choose a thick sauce that meets your dietary requirements so it does not make the tortilla soggy.
4. Why Does My Crunchy Wrap Fall Apart?
The wrap may be overfilled, folded too loosely, or cooked before the seam is secure. Use a small tortilla to cover the filling, fold the large tortilla in overlapping sections, and cook seam-side down first.
5. Can I Prepare the Beef Filling Ahead of Time?
Yes. Cook the seasoned beef up to 2 days ahead and store it in the refrigerator. Reheat it thoroughly before assembly, or allow it to cool safely and assemble the wraps before toasting them.
6. How Can I Make the Wraps Less Spicy?
Leave out the chili powder and use mild paprika. Choose a mild salsa and add plain sour cream or yogurt for a creamy, cooling topping.
7. Can I Make These Wraps Without Sour Cream?
Yes. Plain yogurt or a simple garlic yogurt sauce works well as a substitute. You can also leave it out if you prefer a less creamy filling.
8. What Is the Best Cheese for Crunchy Wraps?
Cheddar provides a strong, savory flavor, while mozzarella creates a stretchy, melty texture. A combination of both offers a good balance of flavor and melt.
9. Can These Wraps Be Cooked in an Air Fryer?
Yes. Place the folded wraps seam-side down in a lightly greased air fryer basket and cook at 350°F (175°C) for approximately 5–8 minutes, turning halfway through if necessary. Avoid overcrowding the basket.
10. How Do I Keep the Crunchy Center Crisp?
Use a sturdy tostada or tortilla chips, avoid excess liquid in the beef, and serve the wraps shortly after cooking. Fresh toppings should be placed away from the hottest filling when possible.
Conclusion
Ultimate Homemade Cheesy Beef Crunchy Wraps bring together everything that makes a satisfying meal: juicy seasoned beef, creamy melted cheese, crisp tortillas, and a delicious crunchy center.
The ingredients are simple, the preparation is beginner-friendly, and the filling can be customized with different spices, vegetables, and sauces. A quick toast in a skillet gives each wrap its golden, crispy finish without complicated cooking techniques.
Serve these Cheesy Beef Crunchy Wraps with fresh salad, salsa, or creamy garlic yogurt sauce for an easy lunch or dinner. Prepare a batch for the family, enjoy the contrast of textures, and make this homemade favorite part of the regular meal rotation.