
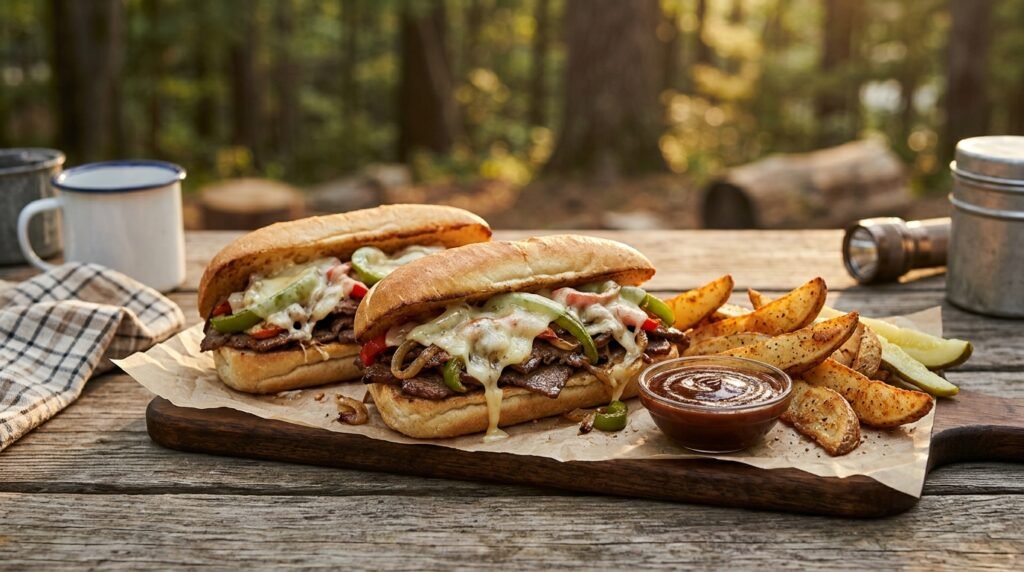
A Smoky Campfire Cheesy Beef Steak Sandwich brings the bold flavor of grilled beef, melted cheese, and buttery toasted bread together in one hearty meal. Tender strips of beef are cooked with sweet onions and peppers, seasoned with smoky spices, and topped with gooey cheese before being tucked into a warm, crispy sandwich roll.
This recipe is perfect for camping trips, backyard cookouts, weekend lunches, or any meal that calls for something filling and full of flavor. Cooking the beef over a campfire adds a wonderful smoky character, while a cast-iron skillet helps create beautifully browned meat and tender vegetables.
The best part is that this sandwich doesn’t require complicated ingredients. Beef steak, onions, bell peppers, cheese, bread rolls, and a handful of seasonings are enough to create a satisfying meal. A little butter on the bread adds a golden crust, and a quick cover over the skillet helps the cheese melt into the hot beef.
Whether cooked over a campfire or prepared on a regular stovetop, this cheesy beef steak sandwich delivers a delicious combination of smoky, savory, juicy, and cheesy flavors. Serve it hot with pickles, potato wedges, or a fresh salad for a meal that feels comforting and adventurous at the same time.
Why You’ll Love This Recipe
- Smoky, grilled flavor: Cooking over hot coals or a campfire adds a rustic, savory taste.
- Tender, juicy beef: Thinly sliced steak cooks quickly and absorbs the seasonings beautifully.
- Melted cheesy goodness: Provolone, cheddar, or mozzarella creates a rich, satisfying finish.
- Golden toasted bread: Buttered sandwich rolls add crunch and help hold the juicy filling.
- Easy camping meal: The ingredients are simple, and most of the cooking can be done in one skillet.
- Customizable fillings: Add mushrooms, jalapeños, extra onions, or your favorite sauce.
- Perfect for sharing: Prepare several sandwiches for a group camping trip or backyard gathering.
Recipe Overview
- Prep Time: 15 minutes
- Cook Time: 20–25 minutes
- Total Time: 35–40 minutes
- Servings: 4 sandwiches
- Course: Lunch or Dinner
- Cuisine: American-Inspired
- Cooking Method: Campfire or Stovetop
- Flavor: Smoky, savory, cheesy, and buttery
Ingredients for the Campfire Cheesy Beef Steak Sandwich
For the Beef Filling
- 1 pound (450 g) beef steak, such as sirloin or flank steak
- 1 large yellow onion, thinly sliced
- 1 medium bell pepper, thinly sliced
- 2 tablespoons olive oil
- 1 teaspoon garlic powder
- 1 teaspoon smoked paprika
- 1/2 teaspoon black pepper
- 3/4 teaspoon salt, or to taste
- 1 teaspoon Worcestershire sauce
- 1 tablespoon water or beef broth, if needed
For the Sandwiches
- 4 sturdy sandwich rolls, hoagie rolls, or sub rolls
- 4 slices provolone cheese, cheddar, or mozzarella
- 2 tablespoons butter, softened
- 1 tablespoon chopped fresh parsley, optional
Optional Toppings
- 1/2 cup sliced mushrooms
- 1–2 jalapeños, thinly sliced
- 4 tablespoons mayonnaise or garlic sauce
- 2 tablespoons barbecue sauce
- Pickled peppers or sliced pickles, for serving
Ingredient Notes and Substitutions
Beef steak: Sirloin is a great all-purpose choice because it cooks quickly and has a good balance of tenderness and flavor. Flank steak also works well when sliced thinly against the grain. Ribeye creates a richer sandwich but contains more fat.
Onion: Yellow onions become sweet and tender as they cook. Red onions can be used for a slightly sharper flavor.
Bell pepper: Green bell pepper gives the filling a classic savory taste, while red or yellow peppers add sweetness.
Smoked paprika: This seasoning adds smoky flavor even when the sandwich is cooked indoors. If cooking over a campfire, it complements the natural flavor of the fire.
Worcestershire sauce: A small amount deepens the savory taste. Soy sauce can be substituted, but it is saltier, so adjust the added salt.
Cheese: Provolone melts smoothly and pairs beautifully with steak. Cheddar offers a sharper flavor, while mozzarella gives a mild, stretchy finish.
Sandwich rolls: Choose rolls sturdy enough to hold the filling without falling apart. Soft hoagie rolls work well, especially when lightly toasted.
Olive oil and butter: Olive oil helps brown the beef and vegetables, while butter creates a golden, flavorful bread crust.
Equipment Needed
- Cast-iron skillet or heavy-duty frying pan
- Campfire cooking grate or stable outdoor cooking setup
- Heat-resistant tongs or spatula
- Sharp knife and cutting board
- Small bowl for seasoning
- Butter knife or pastry brush
- Heat-resistant gloves
- Instant-read food thermometer
- Foil or a skillet lid for melting the cheese, if needed
How to Make a Smoky Campfire Cheesy Beef Steak Sandwich
Step 1: Prepare the Beef
Place the steak on a clean cutting board and pat it dry with paper towels. Slice it into thin strips against the grain, aiming for pieces approximately 1/4 inch (6 mm) thick.
Slicing against the grain shortens the muscle fibers, helping the cooked beef feel more tender. If the steak is difficult to slice thinly, place it in the freezer for about 15–20 minutes to firm it slightly before cutting.
Transfer the beef to a bowl. Add the garlic powder, smoked paprika, black pepper, and salt. Toss until the strips are evenly seasoned.
Keep raw beef separate from bread, cheese, vegetables, and other ready-to-eat ingredients.
Step 2: Prepare the Vegetables
Thinly slice the onion and bell pepper. If using mushrooms or jalapeños, prepare those as well.
Keep the vegetables in a separate container until cooking. For camping, the vegetables can be sliced at home and transported in a sealed food-safe container inside a cooler at 40°F (4°C) or below.
Preparing the ingredients in advance makes campfire cooking easier and reduces the amount of equipment needed outdoors.
Step 3: Prepare the Campfire or Skillet
Build a safe campfire in an established fire ring or use a designated camping grill. Allow the flames to settle and create a bed of hot coals before placing the skillet over the heat.
Direct flames can burn the food and make the cooking temperature difficult to control. A bed of hot coals usually provides steadier heat.
Place a cast-iron skillet on a stable cooking grate. Let it preheat for a few minutes, then add 1 tablespoon of olive oil.
For indoor cooking, heat a heavy skillet over medium-high heat on the stovetop and follow the same cooking steps.
Step 4: Sear the Beef
Add the seasoned beef to the hot skillet in a single layer. If the skillet is small, cook the beef in two batches rather than overcrowding it.
Let the strips cook briefly without moving them too much so they can brown. Turn and stir for approximately 3–5 minutes, adjusting for thickness and heat.
Continue cooking until the beef is browned and reaches a safe internal temperature. For whole-cut beef steaks, the minimum recommended temperature is 145°F (63°C), followed by a 3-minute rest. Thin strips can be difficult to measure accurately, so use an instant-read thermometer on representative thicker pieces or cook the steak whole and slice it after resting if temperature measurement is challenging.
Transfer the cooked beef to a clean plate. Keep it covered loosely while preparing the vegetables.

Step 5: Cook the Onions and Peppers
Add the remaining tablespoon of olive oil to the skillet. Add the sliced onions and bell peppers.
Cook for approximately 5–7 minutes, stirring occasionally, until the vegetables soften and develop golden edges. If using mushrooms, add them with the onions and peppers or once the onions have started to soften.
Scrape up the browned bits from the skillet as the vegetables release moisture. These browned bits add extra savory flavor.
If the skillet becomes too dry, add 1 tablespoon water or beef broth. Stir gently and allow the liquid to reduce.
Step 6: Combine the Beef and Vegetables
Return the cooked beef to the skillet with the vegetables. Add the Worcestershire sauce and toss everything together.
Cook for another 1–2 minutes, stirring until the flavors combine and the filling is hot throughout. Taste and adjust the seasoning if needed.
If the mixture looks dry, add a small splash of water or beef broth. Avoid adding too much liquid, as excess moisture can make the bread soggy.
Move the skillet to a cooler part of the grate or reduce the stovetop heat to low.
Step 7: Toast the Sandwich Rolls
Slice the rolls lengthwise, keeping one edge attached if preferred. Spread the cut sides lightly with softened butter.
Place the rolls cut-side down on a clean part of the grill grate or in a separate skillet. Toast for approximately 1–2 minutes, watching closely so the bread does not burn.
The cut sides should become lightly golden and crisp while the centers remain soft. Remove the rolls from the heat and set them aside.
If the fire is too intense, toast the rolls in a separate skillet rather than placing them directly over flames.
Step 8: Add the Cheese
Divide the beef and vegetable filling evenly among the toasted rolls, or return the filling to the skillet for easier assembly.
Place a slice of cheese over the hot filling. Cover the skillet with a lid or loosely with foil for 30–90 seconds, until the cheese melts.
If assembling directly in the rolls, place them on a baking tray or suitable covered skillet and warm briefly until the cheese melts. Keep the bread away from direct flames to prevent burning.
Use heat-resistant gloves or tongs when handling the hot skillet and cover.
Step 9: Add Toppings
Sprinkle with chopped parsley if desired. Add mayonnaise, garlic sauce, or barbecue sauce to taste.
For a little heat, add sliced jalapeños or pickled peppers. For extra crunch, serve with pickles on the side rather than adding too much liquid to the sandwich.
Avoid overfilling the rolls. A balanced amount of beef, vegetables, and cheese makes the sandwiches easier to hold and eat.
Step 10: Serve Hot
Transfer the sandwiches to a serving board or plates. Let them rest for a minute or two so the filling settles slightly.
Serve immediately while the beef is warm, the cheese is melted, and the bread is still crisp at the edges.
Pair the sandwiches with potato wedges, a fresh salad, corn on the cob, or baked beans for a satisfying camping-style meal.
Tips for the Best Campfire Beef Steak Sandwich
1. Slice Against the Grain
Look for the direction of the muscle fibers and cut across them. This makes the beef easier to chew, especially when using flank steak or another lean cut.
2. Keep the Heat Steady
A bed of hot coals gives better control than tall, active flames. If the pan begins smoking excessively or the beef darkens too quickly, move it to a cooler area.
3. Avoid Overcrowding the Skillet
Too much beef at once releases moisture and prevents proper browning. Cook in batches if needed, then combine everything at the end.
4. Brown the Beef Before Adding the Vegetables
Cooking the beef separately helps develop a rich crust without allowing the vegetables to release moisture into the pan too early.
5. Choose a Good Melting Cheese
Provolone, mozzarella, and cheddar all work well. Slice the cheese thinly so it melts quickly over the hot filling.
6. Toast the Bread Lightly
A crisp cut surface helps the bread resist moisture from the filling. Avoid toasting it until completely hard, because it can become difficult to bite.
7. Use a Little Liquid Only When Needed
A tablespoon of water or broth can loosen flavorful browned bits and keep the filling moist. Too much liquid can make the sandwich soggy.
8. Assemble Just Before Serving
Keep the beef filling hot and the rolls separate until everyone is ready to eat. Assemble at the last minute to maintain the best bread texture.
9. Practice Safe Campfire Cooking
Use a stable cooking grate, keep children and loose clothing away from the fire, and handle the skillet with heat-resistant gloves. Follow local fire restrictions and never leave the fire unattended.
Easy Variations
Spicy Campfire Steak Sandwich
Add sliced jalapeños, a pinch of chili flakes, or a little hot sauce to the filling. Pepper Jack cheese is another excellent option for extra heat.
Mushroom and Swiss Steak Sandwich
Replace the bell pepper with 1 cup sliced mushrooms or use both. Cook the mushrooms until browned and tender, then top the filling with Swiss cheese for a rich, earthy flavor.
BBQ Cheesy Beef Sandwich
Stir 1–2 tablespoons barbecue sauce into the cooked beef and vegetable mixture. Use cheddar cheese for a smoky, tangy variation. Add the sauce gradually so the filling remains thick enough for the bread.
Garlic Butter Steak Sandwich
Mix 1 minced garlic clove with the softened butter and spread it over the rolls before toasting. Finish the sandwiches with a little chopped parsley for extra aroma.
Extra-Cheesy Steak Sandwich
Use two thin slices of cheese per sandwich or combine provolone with cheddar. Add the cheese in layers over the hot filling and cover briefly until fully melted.
Caramelized Onion Steak Sandwich
Cook the onions over medium-low heat for 15–20 minutes, stirring occasionally, until deeply golden and sweet. Prepare them ahead of time to keep the main cooking process quick.
Steak and Pepper Jack Sandwich
Use Pepper Jack cheese, green bell pepper, and a little smoked paprika. This combination gives the sandwich a savory flavor with a gentle kick.
Stovetop Version
Heat a heavy skillet over medium-high heat and follow the recipe indoors. Sear the beef, cook the vegetables, combine the filling, toast the rolls, and melt the cheese under a lid. Smoked paprika and a little Worcestershire sauce provide a smoky, savory taste without a campfire.
What to Serve with a Cheesy Beef Steak Sandwich
- Crispy potato wedges: A hearty side that complements the juicy beef and melted cheese.
- Grilled corn on the cob: A natural choice for an outdoor meal.
- Fresh green salad: Adds freshness and balances the rich sandwich.
- Pickles and pickled peppers: Their acidity cuts through the cheese and beef.
- Baked beans: A classic camping side with a slightly sweet, smoky flavor.
- Coleslaw: Provides a crunchy, creamy contrast to the warm sandwich.
- Roasted vegetables: Bell peppers, zucchini, and onions work well with the same smoky seasonings.
- Potato chips: An easy option for picnics and casual outdoor meals.
Make-Ahead Instructions
This sandwich is easy to prepare in stages, especially when cooking at a campsite.
Prepare the vegetables at home: Slice the onions, bell peppers, and mushrooms before leaving. Store them in a sealed container in the refrigerator or cooler.
Season the beef: Mix the dry seasonings in a small container ahead of time. Keep the raw beef sealed and cold, then season it shortly before cooking.
Prepare the rolls: Bring the rolls whole to prevent them from drying out. Pack the butter in a separate sealed container.
Make the filling ahead: The beef and vegetables can be cooked ahead and refrigerated promptly in a shallow container. Reheat them in a skillet until steaming hot before adding the cheese and assembling the sandwiches.
Pack safely: Keep raw beef separate from cooked food and ready-to-eat ingredients. Use a cooler with enough ice or cold packs to maintain a temperature of 40°F (4°C) or below.
For the best texture, toast the bread and melt the cheese just before serving.
Storage and Reheating
How to Store Leftovers
If the beef filling is not served immediately, refrigerate it in a shallow, airtight container within 2 hours of cooking, or within 1 hour if the outdoor temperature is above 90°F (32°C).
Store cooked beef and vegetables in the refrigerator at 40°F (4°C) or below and consume within 3–4 days. Keep the rolls separate so they do not absorb moisture.
Avoid leaving meat-filled sandwiches sitting outdoors in warm weather. Use a cooler for cold storage and discard food that has been left outside safe temperature limits.
How to Reheat the Filling
Skillet: Place the beef and vegetables in a skillet with a small splash of water or beef broth. Cover and warm over medium-low heat, stirring occasionally, until steaming hot.
Oven: Place the filling in an oven-safe dish, cover it, and heat at 350°F (175°C) until hot throughout.
Microwave: Transfer the filling to a microwave-safe dish, cover loosely, and heat in short intervals. Stir between intervals for more even heating.
Reheat leftovers to 165°F (74°C).
How to Reheat an Assembled Sandwich
For a crispier result, wrap the sandwich loosely in foil and warm it in a 350°F (175°C) oven until the center is hot. Open the foil for the final few minutes to crisp the bread slightly.
An air fryer can also work, but avoid overheating the bread before the filling is warm. Remove cold toppings such as lettuce or pickles before reheating, then add them afterward.
Can the Filling Be Frozen?
Yes. Cool the cooked beef and vegetables promptly, then place them in a freezer-safe container. Freeze for up to 2–3 months for best quality. Thaw in the refrigerator and reheat to 165°F (74°C) before assembling fresh sandwiches.
Freezing the filling separately usually gives a better result than freezing the fully assembled sandwich, because the bread can become soggy after thawing.
Frequently Asked Questions
1. What is the best beef for a steak sandwich?
Sirloin is a reliable option because it is flavorful, relatively tender, and easy to slice. Flank steak works well when cut thinly against the grain. Ribeye provides a richer flavor but is usually more expensive.
2. Can this sandwich be made without a campfire?
Yes. A cast-iron skillet on a stovetop works perfectly. Smoked paprika, browned beef, and a little Worcestershire sauce create a savory, smoky-inspired flavor even without an outdoor fire.
3. Which cheese melts best over steak?
Provolone is a classic choice, while mozzarella offers a mild, stretchy texture. Cheddar adds a sharper flavor, and Pepper Jack is useful for a spicier sandwich.
4. How can the beef stay tender?
Choose a suitable cut, slice thinly against the grain, cook in a hot skillet without overcrowding, and avoid cooking longer than necessary. Resting a whole steak before slicing can also help retain its juices.
5. Can the beef filling be prepared ahead of time?
Yes. Cook the beef and vegetables, cool them promptly, and refrigerate in a sealed container. Reheat thoroughly in a skillet before assembling the sandwiches.
6. How can the bread be kept from getting soggy?
Toast the cut sides lightly with butter, drain excess liquid from the filling, and assemble the sandwiches immediately before serving. Avoid adding too much barbecue sauce or other watery toppings.
7. Can other vegetables be added?
Yes. Mushrooms, sliced jalapeños, roasted red peppers, and caramelized onions are all good additions. Cook vegetables until tender and remove excess moisture before assembling the sandwich.
8. Is this recipe suitable for camping?
Yes, provided the raw beef and other perishable ingredients are kept properly chilled. Bring a stable cooking grate, a heavy skillet, heat-resistant gloves, and the necessary utensils. Follow local fire rules and use an established fire area.
9. How can the sandwich be made spicier?
Add jalapeños, chili flakes, hot sauce, or Pepper Jack cheese. Start with a small amount and adjust the heat to taste.
10. Can chicken be used instead of beef?
Yes. Thinly sliced chicken breast or thigh meat can replace the steak. Cook the chicken to an internal temperature of 165°F (74°C), then combine it with the vegetables and cheese.
11. How should leftovers be stored safely?
Refrigerate cooked beef and vegetables within 2 hours, or within 1 hour in temperatures above 90°F (32°C). Store at 40°F (4°C) or below and use within 3–4 days. Reheat to 165°F (74°C).
12. What makes this sandwich taste smoky?
Cooking over hot coals adds natural smoke and charred flavor. Smoked paprika reinforces that taste, while browning the beef and onions creates deeper savory notes. Indoors, smoked paprika is the simplest way to add a campfire-inspired flavor.
Conclusion
The Smoky Campfire Cheesy Beef Steak Sandwich is a hearty, flavor-packed meal made with tender beef, sweet onions, bell peppers, melted cheese, and buttery toasted bread. Its rustic smoky flavor makes it ideal for camping trips, backyard cookouts, and easy family dinners.
For the best results, slice the beef thinly against the grain, brown it in batches, keep the filling moist without making it watery, and melt the cheese over the hot meat just before serving. Toasted rolls add a crisp edge that holds everything together.
Serve the sandwiches with potato wedges, pickles, grilled corn, or a fresh salad for a satisfying meal. Whether cooked over a bed of hot coals or on a kitchen stovetop, this cheesy steak sandwich is a delicious way to bring bold, campfire-inspired flavor to the table.