Easy Cheesy Mini Pizzas are the perfect combination of soft, golden homemade pizza crust, flavorful tomato sauce, melted mozzarella cheese, and delicious toppings. These little pizzas are fun to prepare, easy to customize, and ideal for family dinners, after-school snacks, birthday parties, game nights, or weekend treats.
Instead of ordering takeout, make these mini pizzas from scratch using simple pantry ingredients. The homemade dough creates a soft center with lightly crisp edges, while the tomato sauce and bubbling cheese deliver the classic pizza flavor everyone loves. Each mini pizza is individually sized, making serving simple and allowing everyone to choose their favorite toppings.
This recipe uses an easy yeast dough that requires only a short resting period. Once the dough is ready, divide it into small portions, shape the pizza bases, spread on the sauce, add plenty of mozzarella, and finish with your favorite toppings. A hot oven transforms the assembled pizzas into golden, cheesy bites that smell just like a freshly baked pizza shop favorite.
The best part is how versatile these mini pizzas can be. Keep them simple with cheese, add colorful vegetables, or include cooked chicken, beef, or turkey pepperoni. They are also a great recipe for cooking with children because the small bases are easy to decorate.
Whether served as a snack, party appetizer, or easy meal, these Easy Cheesy Mini Pizzas are guaranteed to bring homemade pizza goodness to the table.
Why You Will Love This Recipe
Loaded with cheese: Mozzarella melts beautifully over the tomato sauce, creating a gooey, satisfying topping.
Homemade from scratch: The simple dough gives you fresh pizza flavor without needing store-bought pizza bases.
Perfect individual portions: Each pizza is easy to hold, serve, and customize.
Simple ingredients: Flour, yeast, tomato sauce, cheese, and everyday seasonings are all you need for the basic recipe.
Family-friendly: Mild, cheesy flavors make these mini pizzas a great option for children and adults.
Easy to customize: Add vegetables, cooked meat, herbs, or extra cheese to suit different tastes.
Great for parties: Serve them at birthday parties, picnics, family gatherings, or casual get-togethers.
Freezer-friendly: The baked mini pizzas can be frozen for convenient snacks and quick meals later.
Recipe Overview
- Preparation time: 20 minutes
- Dough resting time: 45–60 minutes
- Cooking time: 10–13 minutes per batch
- Total time: Approximately 1 hour and 15 minutes
- Servings: 4 people
- Yield: 8 mini pizzas
- Course: Snack, appetizer, or light meal
- Cuisine: Italian-inspired
- Cooking method: Baking
- Difficulty: Easy
Ingredients for Easy Cheesy Mini Pizzas
The following ingredients make eight mini pizzas, each approximately 4 inches (10 cm) wide.
For the Homemade Pizza Dough
- 2 cups (250 g) all-purpose flour, plus a little extra for shaping
- ¾ cup (180 ml) warm water
- 1 teaspoon instant yeast
- 1 teaspoon granulated sugar
- ¾ teaspoon salt
- 1 tablespoon olive oil
For the Pizza Sauce
- ½ cup (120 g) pizza sauce or thick tomato sauce
- ½ teaspoon garlic powder
- ½ teaspoon dried oregano
- ¼ teaspoon black pepper
- ¼ teaspoon salt, or to taste
For the Cheesy Topping
- 1½ cups (about 170 g) shredded mozzarella cheese
- 2 tablespoons grated Parmesan cheese, optional
- ½ teaspoon dried oregano, for sprinkling
- 1 teaspoon olive oil, optional, for brushing the crust edges
Optional Pizza Toppings
Choose one or more of these toppings, using a small amount so the mini pizzas bake evenly.
- ¼ cup finely diced bell pepper
- ¼ cup sliced mushrooms
- ¼ cup sliced black olives
- ¼ cup finely chopped onion
- ⅓ cup cooked, diced chicken
- ⅓ cup cooked ground beef
- ¼ cup sliced turkey pepperoni
- A pinch of chili flakes, optional
- Fresh basil leaves, optional, for serving
Use fully cooked meat toppings. If using vegetables that release plenty of moisture, such as mushrooms, lightly sauté them first and allow them to cool before adding them to the pizzas.
Ingredient Notes and Substitutions
All-purpose flour: Regular all-purpose flour makes a soft, easy-to-shape dough. Bread flour can also be used for a slightly chewier crust.
Instant yeast: Instant yeast mixes directly into the dry ingredients. If using active dry yeast, dissolve it in the warm water with the sugar first and let it stand for approximately 5–10 minutes until foamy.
Warm water: The water should feel comfortably warm rather than hot. Very hot water can damage the yeast and prevent the dough from rising properly.
Olive oil: Oil adds softness and makes the dough easier to handle. A neutral cooking oil can be substituted.
Pizza sauce: Use a thick pizza sauce so the dough does not become soggy. If using plain tomato sauce, add garlic, oregano, salt, and black pepper for extra flavor.
Mozzarella cheese: Low-moisture mozzarella is especially useful because it melts well without releasing too much water. Fresh mozzarella can also be used, but drain it well and pat it dry before adding it.
Parmesan cheese: This optional ingredient adds a salty, savory flavor. It can be omitted or replaced with another hard cheese suitable for pizza.
Equipment You Will Need
- Large mixing bowl
- Measuring cups and spoons or a kitchen scale
- Wooden spoon or spatula
- Clean work surface
- Rolling pin or your hands for shaping
- Baking tray
- Baking parchment
- Small spoon for spreading sauce
- Oven mitts
- Cooling rack, optional
A pizza cutter or sharp knife can be useful for serving, although these small pizzas are also easy to eat by hand.
How to Make Easy Cheesy Mini Pizzas
Step 1: Prepare the Dough
In a large mixing bowl, combine the flour, instant yeast, sugar, and salt. Mix the dry ingredients until evenly distributed.
Pour in the warm water and olive oil. Stir with a wooden spoon until a rough dough begins to form.
Transfer the dough to a lightly floured surface and knead for approximately 6–8 minutes. Push the dough away with the heel of your hand, fold it back over itself, and repeat until it becomes smooth and elastic.
The dough should feel soft and slightly tacky but should not stick heavily to your hands. If it is very sticky, add flour a teaspoon at a time. If it feels too dry or difficult to bring together, add a little water, about one teaspoon at a time.
Step 2: Let the Dough Rise
Lightly grease a clean bowl with a small amount of oil. Place the dough inside and turn it once so the surface is lightly coated.
Cover the bowl with a clean kitchen towel or reusable cover. Leave it in a comfortably warm place for approximately 45–60 minutes, or until the dough has visibly expanded and is close to twice its original size.
The exact rising time depends on room temperature and yeast activity. A cooler kitchen may require additional time.
Do not place the dough in an excessively hot location. Gentle warmth helps the yeast work without damaging the dough.
Step 3: Prepare the Pizza Sauce
While the dough rises, place the pizza sauce in a small bowl. Add the garlic powder, dried oregano, black pepper, and salt.
Stir until combined, then taste and adjust the seasoning if necessary.
Keep the sauce fairly thick. A watery sauce can make the bases soft and difficult to handle, especially when the pizzas are loaded with cheese and toppings.
Prepare the vegetables and any other toppings while the dough finishes rising. Chop everything into small pieces so the toppings fit neatly on the mini pizzas.
Step 4: Divide the Dough
Once the dough has risen, gently press it down to release some of the trapped air.
Transfer it to a lightly floured work surface and divide it into eight equal portions. For consistent results, weigh the dough and divide the total weight by eight.
Shape each portion into a small ball. Cover the balls with a clean towel and allow them to rest for about 5 minutes. This short rest relaxes the dough and makes shaping easier.
Step 5: Shape the Mini Pizza Bases
Preheat the oven to 450°F (230°C). Line a baking tray with baking parchment.
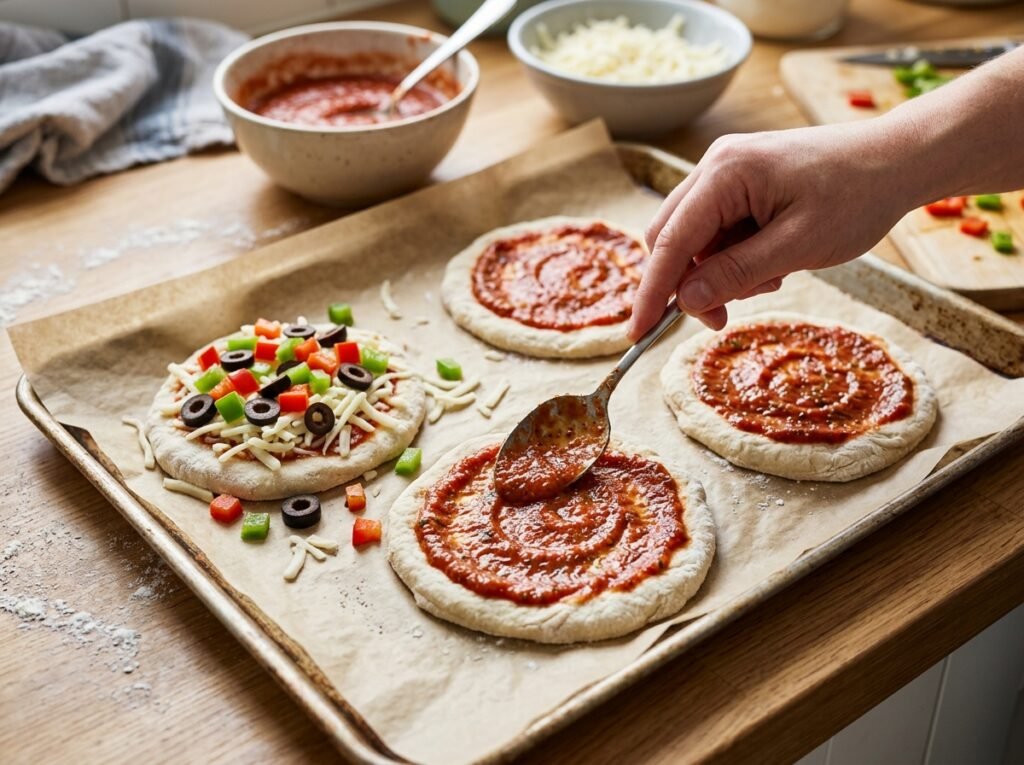
Take one dough ball and flatten it with your fingertips or a rolling pin into a circle approximately 4 inches (10 cm) wide. Aim for a thickness of around ¼ inch (6 mm).
Press slightly around the edge to create a small raised rim that helps hold the sauce and cheese in place.
Repeat with the remaining dough portions, leaving a little space between the bases on the baking tray. If the tray is too small, bake the pizzas in batches rather than crowding them.
For a slightly crisper base, let the shaped dough rest for another 5 minutes while the oven finishes heating.
Step 6: Add the Pizza Sauce
Spoon approximately 1 tablespoon of seasoned pizza sauce onto each base. Spread it in a thin, even layer, leaving the outer rim uncovered.
Avoid adding too much sauce. Excess moisture can prevent the centers from baking properly and may make the pizzas difficult to lift from the tray.
For extra flavor, brush the uncovered crust edges with a little olive oil.
Step 7: Add the Cheese and Toppings
Sprinkle the shredded mozzarella evenly over the sauce on each mini pizza. Divide the cheese between all eight bases, reserving a little for the tops if desired.
Add the optional Parmesan and your chosen toppings. Try bell peppers, mushrooms, olives, cooked chicken, ground beef, or turkey pepperoni.
Keep the toppings relatively light. Too much cheese or too many toppings can weigh down the small dough bases and make the centers soggy.
Finish with a light sprinkle of dried oregano for a classic pizza aroma.
Step 8: Bake Until Golden and Bubbly
Place the baking tray on the middle rack of the preheated oven.
Bake for approximately 10–13 minutes, checking near the end of the cooking time. The exact time depends on the thickness of the dough, your oven, and the amount of toppings.
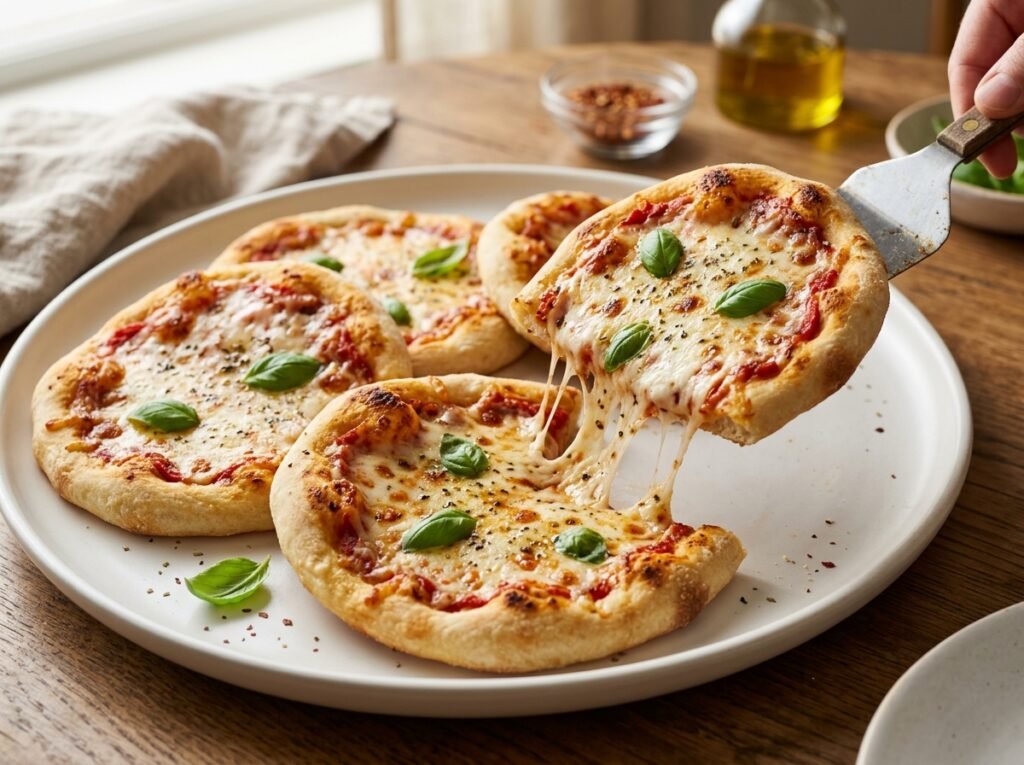
The pizzas are ready when the cheese is melted and bubbling, the edges are golden, and the dough is cooked through underneath. If the cheese is melting but the bases need more time, continue baking for another minute or two while watching carefully.
For a deeper golden finish, briefly use the oven’s grill or broiler setting only if appropriate for your oven, and watch the pizzas continuously to prevent burning.
Use oven mitts to remove the tray safely.
Step 9: Cool Slightly and Serve
Let the mini pizzas rest on the tray for approximately 2–3 minutes before transferring them to a serving plate or cooling rack.
This short pause allows the melted cheese to settle and makes the pizzas easier to handle.
Add fresh basil, a pinch of chili flakes, or a light sprinkle of Parmesan if desired.
Serve warm while the cheese is soft and stretchy and the crust is freshly baked.
Tips for the Best Mini Pizzas
Measure the flour accurately. Too much flour can make the dough dry and dense. A kitchen scale gives the most consistent results.
Check the water temperature. Water that is too hot can damage the yeast, while very cold water may slow the rising process.
Give the dough enough time to rise. The dough should look noticeably expanded before shaping.
Use thick pizza sauce. A thick sauce adds flavor without soaking the dough.
Do not overload the toppings. Mini pizzas have a small surface area, so a modest amount of toppings gives the best balance of crust, sauce, and cheese.
Preheat the oven fully. A hot oven helps the dough bake properly and gives the cheese a delicious bubbly finish.
Shred mozzarella freshly if possible. Freshly shredded low-moisture mozzarella often melts smoothly. Some pre-shredded cheeses contain anti-caking ingredients that can affect how they melt.
Bake in batches if necessary. Leaving space between the pizzas helps hot air circulate and promotes more even baking.
Watch the final minutes. Small pizzas can brown quickly, especially around their edges.
Let them rest briefly before serving. The cheese will still be warm and gooey but less likely to slide off immediately.
Delicious Variations
Classic Cheese Mini Pizzas
Keep things simple with pizza sauce, mozzarella, Parmesan, and dried oregano. This version is perfect for anyone who loves the classic cheese pizza flavor.
Vegetable Mini Pizzas
Top the bases with diced bell peppers, mushrooms, onions, olives, and mozzarella. Lightly cook watery vegetables beforehand to reduce excess moisture.
Chicken Cheese Mini Pizzas
Add small pieces of cooked, seasoned chicken under the mozzarella. A little garlic powder, paprika, and oregano pairs beautifully with the tomato sauce.
Beef Mini Pizzas
Use finely crumbled cooked ground beef seasoned with salt, black pepper, and a pinch of paprika. Drain any excess fat before adding it to the pizza bases.
Turkey Pepperoni Mini Pizzas
Arrange a few slices of turkey pepperoni over the mozzarella for a classic pepperoni-style pizza. Check the packaging if you need a particular dietary certification.
Spicy Mini Pizzas
Add chili flakes, a small amount of chopped chili, or a pinch of cayenne pepper to the sauce. Pair the heat with extra mozzarella for a balanced flavor.
Garlic Cheese Mini Pizzas
Mix a little garlic powder into the sauce and add Parmesan along with mozzarella. Brush the crust edges with olive oil before baking for a fragrant finish.
Stuffed-Crust Mini Pizzas
Place a thin strip of mozzarella around the outer edge of each shaped base. Fold the dough over the cheese and pinch to seal before adding the sauce and toppings.
Keep the stuffed rim small so the center and edges cook evenly.
What to Serve with Mini Pizzas
These mini pizzas are satisfying on their own, but a few simple sides can turn them into a complete meal.
- Fresh salad: Serve with lettuce, cucumber, tomatoes, and a light dressing.
- Potato wedges: Add oven-baked potato wedges for a more filling meal.
- Vegetable sticks: Carrot, cucumber, and bell pepper sticks offer a fresh, crunchy contrast.
- Garlic bread: Serve a small portion alongside the pizzas for an extra comforting meal.
- Dips: Offer garlic yogurt dip, tomato dip, or a mild herb sauce.
- Soup: Pair the pizzas with tomato soup for a cozy lunch or dinner.
- Fresh fruit: Apple slices, grapes, or melon make a refreshing addition to a snack platter.
For parties, arrange the pizzas on a large platter and offer a few topping choices so guests can enjoy different flavors.
Make-Ahead Instructions
The dough can be prepared in advance and refrigerated after kneading. Place it in a lightly oiled, covered container and refrigerate it for up to 24 hours. Allow the dough to sit at room temperature briefly until it becomes easier to shape, while keeping it covered.
The pizza sauce can also be mixed ahead of time and refrigerated in an airtight container.
For faster assembly, chop the toppings and shred the cheese in advance, storing them separately in the refrigerator. Assemble the pizzas just before baking for the best texture.
You can also shape the dough bases ahead of time, place them on a parchment-lined tray, cover them, and refrigerate for a short period. If the dough becomes difficult to handle, allow it to relax briefly before adding the toppings.
Storage Instructions
Allow leftover mini pizzas to cool, then place them in an airtight container and refrigerate within 2 hours of cooking. Use refrigerated leftovers within 3–4 days.
Keep the pizzas separate from raw ingredients and use clean utensils when handling cooked food.
For longer storage, freeze the cooled pizzas in a single layer until firm, then transfer them to a freezer-safe container or bag. Separate layers with parchment to help prevent sticking. For best quality, use within 2–3 months.
Label the container with the date so the leftovers are easy to identify.
How to Reheat Mini Pizzas
Oven method: Preheat the oven to 350°F (175°C). Place the pizzas on a baking tray and heat for approximately 5–8 minutes, or until hot throughout.
Air fryer method: Place the pizzas in a single layer and heat at approximately 325°F (160°C) for 3–5 minutes, checking frequently to avoid over-browning.
Microwave method: Heat a pizza on a microwave-safe plate in short intervals until hot. The cheese will melt quickly, although the crust may become softer than when reheated in the oven.
For frozen baked pizzas, reheat them directly from frozen in the oven or air fryer, allowing additional time as needed. Check that the center is thoroughly hot before serving. If using a food thermometer for leftovers, aim for 165°F (74°C).
Frequently Asked Questions
1. Can mini pizzas be made without yeast?
Yes. A quick dough made with self-rising flour and plain yogurt can be used as an alternative, although the texture will differ from traditional yeast dough. Follow a recipe designed for that dough because its moisture and baking time may vary.
2. How big should each mini pizza be?
This recipe makes eight pizzas approximately 4 inches (10 cm) wide. You can make them slightly smaller for party appetizers or larger for a light meal, adjusting the baking time as necessary.
3. Why is the pizza dough not rising?
Possible causes include inactive yeast, water that is too hot, or a room that is too cold. Check the yeast’s expiration date and give the dough enough time in a comfortably warm place.
4. Can store-bought pizza dough be used?
Absolutely. Divide ready-made pizza dough into eight portions, shape the bases, add the sauce and toppings, and bake according to the dough package instructions. Begin checking early because thickness and dough type affect the cooking time.
5. Which cheese is best for mini pizzas?
Low-moisture mozzarella is a reliable choice because it melts well and provides the familiar stretchy texture. Parmesan adds extra flavor, while a small amount of cheddar can create a richer cheese blend.
6. How do you prevent mini pizzas from becoming soggy?
Use thick sauce, avoid excessive toppings, drain watery ingredients, and preheat the oven fully. Baking the pizzas on a properly heated tray can also help the crust cook more effectively.
7. Can the pizzas be made in an air fryer?
Yes, provided the dough and tray or basket fit safely. Air-fry small batches at around 350°F (175°C), checking after approximately 6–9 minutes. The exact timing depends on the air fryer and dough thickness. Ensure the dough is cooked through before serving.
8. Can these mini pizzas be made ahead for a party?
Yes. Prepare the dough, sauce, cheese, and toppings in advance and keep them refrigerated separately. Assemble and bake shortly before serving for the best texture and flavor.
9. Can the mini pizzas be frozen?
Yes. Freeze them after baking and cooling. Store them in an airtight freezer-safe container and reheat until hot throughout. You can also freeze shaped dough portions separately for future use.
10. How do you know when the mini pizzas are fully baked?
Look for golden edges, melted and bubbling cheese, and a cooked base that is not doughy underneath. If the toppings brown too quickly, reduce the heat slightly and continue baking until the crust is cooked through.
11. What other toppings work well?
Finely chopped bell peppers, olives, onions, cooked chicken, cooked beef, mushrooms, and turkey pepperoni are all suitable options. Keep the pieces small and avoid using too many toppings at once.
12. Can children help make this recipe?
Yes. Children can help spread the sauce, sprinkle the cheese, and arrange toppings under adult supervision. An adult should handle the oven, hot baking trays, knives, and any raw ingredients that require careful food-safety handling.
Final Thoughts
Easy Cheesy Mini Pizzas bring the delicious taste of homemade pizza into a fun, individual-sized recipe. The soft dough, rich tomato sauce, melted mozzarella, and customizable toppings make them a great choice for busy afternoons, family meals, and special gatherings.
With a few basic ingredients and a little time for the dough to rise, you can create eight delicious mini pizzas that everyone can personalize. Keep them classic with cheese, add colorful vegetables, or top them with cooked chicken or beef for a heartier bite.
For the best results, remember to let the dough rise properly, keep the sauce layer thin, avoid overloading the toppings, and bake in a fully preheated oven.
Serve these mini pizzas warm and fresh, and enjoy the comforting flavor of homemade pizza in every cheesy bite.