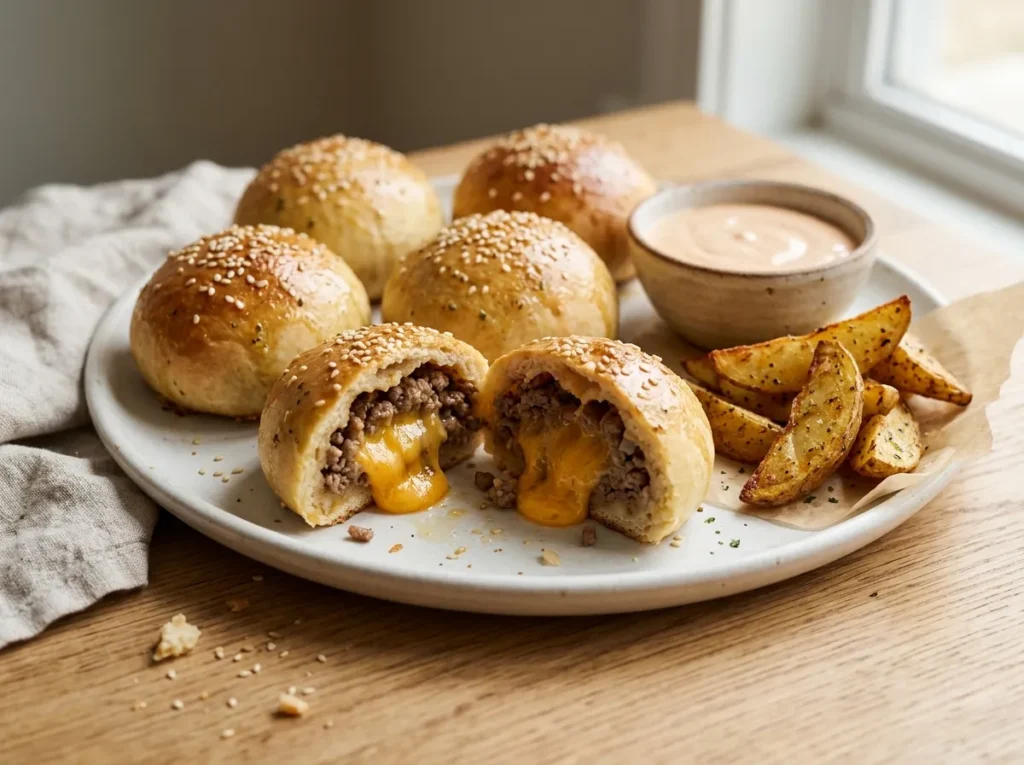
Golden on the outside, juicy in the middle, and filled with savory beef and melted cheese, Stuffed Beef Cheeseburger Bombs bring the delicious taste of a cheeseburger into a soft, bite-sized package. Each little bundle hides a flavorful filling inside tender dough, creating a satisfying combination of crispy edges, fluffy bread, and gooey cheese.
These homemade cheeseburger bombs are a fun alternative to traditional burgers. Instead of using buns, the seasoned beef and cheese are wrapped inside biscuit dough or pizza dough, then baked until beautifully golden. The result is a warm, cheesy snack that is easy to hold, share, and enjoy.
The recipe uses simple ingredients and straightforward steps, making it suitable for beginners and busy home cooks. There is no need for complicated techniques or special equipment. A skillet, a baking tray, and a few everyday ingredients are enough to prepare these delicious stuffed bites.
Stuffed Beef Cheeseburger Bombs are perfect for game nights, family gatherings, lunchboxes, casual dinners, or party appetizers. Serve them with a creamy burger sauce, ketchup, or mustard for an extra burst of flavor.
Whether served fresh from the oven or prepared ahead for a busy day, these cheesy beef bombs deliver classic cheeseburger flavors in a fun, crowd-pleasing form.
Ingredients
This recipe makes approximately 12 stuffed beef cheeseburger bombs.
Ingredients for the Beef Filling
- 1 pound (450 g) ground beef: Choose ground beef with around 85% lean meat for a flavorful, juicy filling.
- 1 teaspoon olive oil: Use if needed to prevent sticking while cooking the beef.
- ½ teaspoon salt: Enhances the flavor of the meat.
- ½ teaspoon ground black pepper: Adds gentle seasoning.
- 1 teaspoon garlic powder: Gives the beef a savory flavor.
- 1 teaspoon onion powder: Adds a classic burger-style taste.
- ½ teaspoon smoked paprika: Provides a subtle smoky note.
- 1 tablespoon finely chopped dill pickles, optional: Adds a tangy cheeseburger flavor.
Ingredients for the Dough and Cheese
- 1 can refrigerated biscuit dough, approximately 16 oz (450 g), containing 10–12 biscuits: Creates a soft, fluffy outer layer. Use a halal-suitable product with no unsuitable ingredients.
- 12 small cheddar cheese cubes, approximately 15 g each: Create the gooey, cheesy center. Cut the cubes to fit comfortably inside the dough.
- 1 tablespoon melted butter: Helps the dough develop a golden, flavorful crust.
- ½ teaspoon garlic powder: Adds extra flavor to the butter topping.
- 1 teaspoon dried parsley: Gives the finished bombs a fresh, herb-like aroma.
If the biscuit dough contains only 10 biscuits, divide each biscuit carefully to create 12 portions, or use enough dough to make 12 equal-sized balls. Another option is to use refrigerated pizza dough.
Ingredients for the Creamy Burger Dipping Sauce
- ½ cup mayonnaise: Provides a creamy base.
- 2 tablespoons ketchup: Adds a sweet, tangy tomato flavor.
- 1 teaspoon yellow mustard: Gives the sauce a classic burger-style taste.
- 1 tablespoon finely chopped dill pickles: Adds texture and tanginess.
- ¼ teaspoon garlic powder: Enhances the savory flavor.
Check all packaged ingredients, including the dough, cheese, and sauces, for halal suitability. Use alcohol-free seasonings and avoid ingredients that do not meet your dietary requirements.
Tools and Equipment
- A large frying pan
- A baking sheet
- Parchment paper
- A mixing bowl
- A spatula or wooden spoon
- A sharp knife
- A cutting board
- Measuring spoons
- A pastry brush
- A small bowl for the dipping sauce
- A food thermometer, if available
Step-by-Step Instructions
Step 1: Preheat the Oven
Preheat the oven to 375°F (190°C).
Line a baking sheet with parchment paper. This prevents the dough from sticking and makes cleanup easier.
Keep the baking tray ready while preparing the beef filling.
Step 2: Cook the Ground Beef
Place a large frying pan over medium-high heat. Add the olive oil if needed, followed by the ground beef.
Break the beef into small pieces with a spatula. Add the salt, black pepper, garlic powder, onion powder, and smoked paprika.
Cook for approximately 7–10 minutes, stirring occasionally, until the beef is browned and fully cooked.
Ground beef should reach an internal temperature of 160°F (71°C). Drain excess fat carefully, leaving enough moisture to keep the filling flavorful.
Step 3: Add the Pickles and Cool the Filling
Stir the finely chopped dill pickles into the cooked beef, if using.
Remove the pan from the heat and allow the filling to cool for about 5–10 minutes. The beef should be warm rather than steaming hot when added to the dough.
Cooling the filling slightly helps prevent the dough from becoming too soft during assembly.
Step 4: Prepare the Cheese
Cut the cheddar cheese into 12 small cubes if it is not already portioned.
Each piece should be small enough to fit inside the dough without stretching it too much. Small cubes melt easily and create a rich, cheesy center.
For a milder flavor, use mozzarella or a combination of cheddar and mozzarella.
Step 5: Prepare the Dough
Open the refrigerated biscuit dough and separate the biscuits.
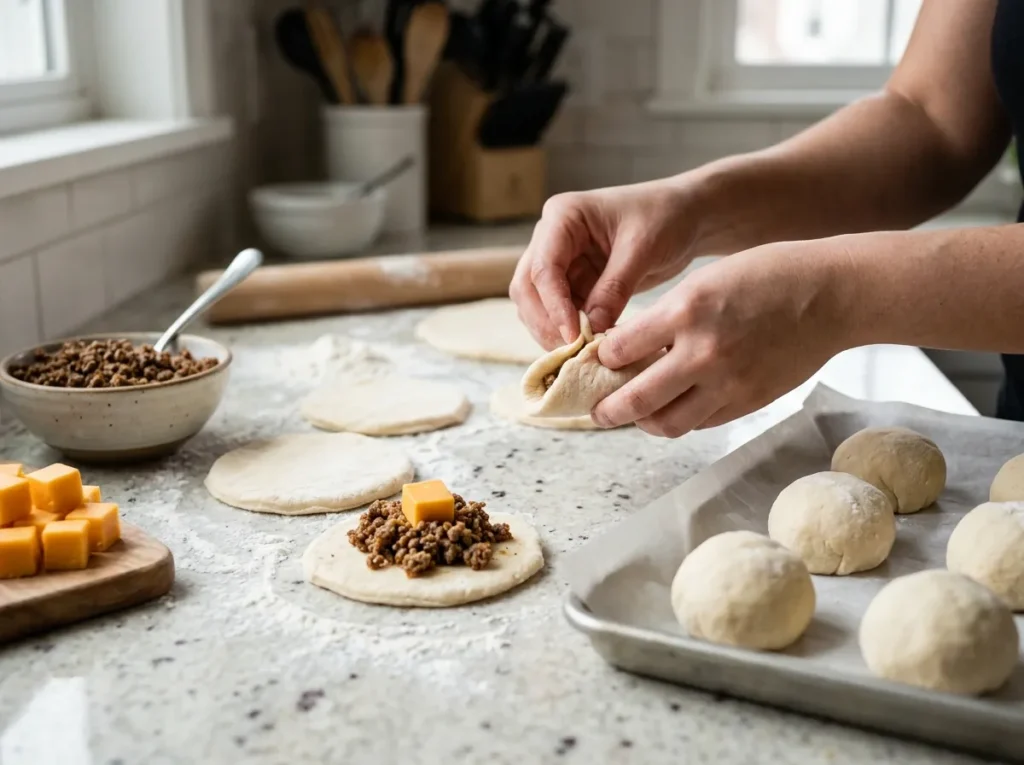
If using 10 biscuits, divide the dough into 12 approximately equal portions. Gently shape each portion into a small ball, then flatten it into a circle using your fingers.
Each piece should be large enough to hold a spoonful of beef and one cheese cube. Avoid making the dough too thin, as it may tear during filling.
If using pizza dough, divide it into 12 equal portions and flatten each one into a small circle.
Step 6: Fill the Dough
Place one portion of the cooked beef in the center of each dough circle. Add one cheddar cheese cube on top.
Keep the filling compact and leave enough dough around the edges to close the ball securely. Avoid adding too much beef, as overfilling makes the dough difficult to seal.
Repeat with the remaining dough portions.
Step 7: Seal the Cheeseburger Bombs
Bring the edges of each dough circle together over the filling.
Pinch the edges firmly to seal the opening, then gently roll the dough between your hands to form a smooth ball.
Place each ball seam-side down on the prepared baking sheet, leaving space between them for expansion.
Check that there are no visible gaps. A secure seal helps prevent melted cheese from leaking onto the tray during baking.
Step 8: Prepare the Garlic Butter Topping
Place the melted butter in a small bowl. Stir in the garlic powder and dried parsley.
Use a pastry brush to lightly coat the tops of the dough balls with the garlic butter mixture.
This simple topping adds flavor and helps the baked dough develop a golden, appetizing finish.
Step 9: Bake Until Golden
Place the baking sheet in the preheated oven.
Bake for approximately 15–20 minutes, or until the dough is puffed, golden brown, and cooked through.
The exact baking time depends on the dough brand and the size of the balls. Begin checking around the 15-minute mark and continue baking if the centers need more time.
If the tops brown too quickly, loosely cover them with foil while the dough finishes baking.
Step 10: Make the Dipping Sauce
While the cheeseburger bombs bake, combine the mayonnaise, ketchup, yellow mustard, chopped dill pickles, and garlic powder in a small bowl.
Stir until the sauce is smooth and evenly mixed.
Taste and adjust the balance of ketchup and mustard if needed. Refrigerate the sauce until serving.
Step 11: Cool Slightly and Serve
Remove the baking sheet from the oven and allow the cheeseburger bombs to rest for about 5 minutes.
The filling will be extremely hot immediately after baking, so a short resting period makes them easier to handle.
Arrange the warm bombs on a serving plate and serve with the creamy burger dipping sauce. Each bite should have a golden crust, tender dough, savory beef, and a soft, melted cheese center.
Tips and Variations for the Best Stuffed Beef Cheeseburger Bombs
Choose the Right Beef
Ground beef with approximately 15% fat provides a good balance of flavor and moisture. Very lean beef can become dry if overcooked, while excessively fatty beef may release too much grease into the dough.
Cook the meat thoroughly, then drain any excess fat before filling the dough. This helps keep the inside juicy without making the pastry greasy.
Let the Filling Cool Before Assembly
Hot beef can soften the dough and make it harder to seal. Allowing the filling to cool slightly makes shaping easier and reduces the chance of the dough tearing.
The filling does not need to be completely cold, but it should not be steaming hot.
Seal Every Ball Carefully
A secure seal is one of the most important parts of this recipe. If the dough is not pinched together firmly, the cheese may escape while baking.
After sealing each ball, gently roll it to smooth the surface. Place it seam-side down so the opening stays closed during baking.
Use Cheese That Melts Well
Cheddar gives the filling a familiar cheeseburger flavor, while mozzarella creates a stretchier texture.
American-style burger cheese can also work, provided it is suitable for your dietary requirements. Cut the cheese into small cubes rather than using one oversized piece, which may be difficult to enclose.
Avoid Overfilling
Too much beef or cheese can cause the dough to split. Use a modest spoonful of beef and one small cheese cube for each bomb.
If the dough stretches too thin, remove a little filling and seal the opening again.
Make the Outside Extra Golden
Brushing the dough with garlic butter adds flavor and color. For an even deeper golden finish, bake the bombs on the center rack of a fully preheated oven.
Avoid placing them too close to the upper heating element, where the tops may brown before the dough cooks through.
Try Different Flavor Variations
These stuffed beef bombs are easy to customize.
- Bacon-style flavor without pork: Add finely chopped, halal-certified beef or turkey strips that have been fully cooked and drained.
- Spicy cheeseburger bombs: Add a small pinch of chili powder or crushed red pepper to the beef.
- Mushroom cheeseburger bombs: Mix in finely chopped mushrooms that have been sautéed until their moisture evaporates.
- Pickle cheeseburger bombs: Add a little extra chopped dill pickle to the filling for a tangier flavor.
- Extra-cheesy bombs: Combine cheddar with mozzarella for a richer, stretchier center.
- Chicken cheeseburger bombs: Replace the beef with finely chopped, fully cooked chicken seasoned with the same spices.
Keep the filling relatively dry so the dough remains easy to seal.
Common Mistakes to Avoid
Using hot filling: Hot beef can soften the dough and make the balls difficult to shape. Let it cool slightly first.
Leaving gaps in the dough: Open seams allow cheese to leak during baking. Pinch the edges firmly and place the balls seam-side down.
Adding too much cheese: Large cheese pieces may force their way through thin dough. Use appropriately sized cubes.
Overcooking the beef: Cook the meat until safe, then remove it from the heat. Prolonged cooking can make the filling dry.
Removing the bombs too early: Pale dough may be undercooked. Look for a golden exterior and make sure the dough is cooked through.
Skipping the resting time: The filling stays extremely hot after baking. Allow the bombs to rest briefly before serving.
Storage and Serving
How to Store Leftover Cheeseburger Bombs
Allow the baked bombs to cool slightly, then transfer them to an airtight container and refrigerate within two hours of cooking.
Store them at 40°F (4°C) or below and consume within 3–4 days. Keep the dipping sauce refrigerated in a separate container.
For the best quality, avoid stacking the bombs while they are still warm because trapped steam can soften their golden exterior.
How to Reheat Stuffed Beef Cheeseburger Bombs
Oven: Preheat to 350°F (175°C). Place the bombs on a baking sheet and heat for approximately 8–12 minutes, or until hot throughout.
Air fryer: Reheat at 325°F (165°C) for approximately 4–7 minutes, checking regularly to prevent excessive browning.
Microwave: Heat in short intervals until the filling is hot. This is the quickest method, but the dough will be softer rather than crisp.
Reheated leftovers containing beef should reach 165°F (74°C) throughout.
Can Cheeseburger Bombs Be Frozen?
Yes. These stuffed beef bombs can be frozen after baking.
Allow them to cool completely, then arrange them on a tray in a single layer and freeze until firm. Transfer the frozen bombs to a freezer-safe airtight container or bag, separating layers with parchment paper if needed.
For the best quality, use them within 2–3 months. Thaw them safely in the refrigerator before reheating, or reheat from frozen with additional cooking time until the centers are thoroughly hot.
Can They Be Prepared Ahead of Time?
Yes. Prepare the beef filling and dipping sauce in advance, then refrigerate them separately.
For the freshest texture, assemble the dough balls shortly before baking. Alternatively, assemble them ahead, cover, and refrigerate for a short period before baking.
If the assembled dough becomes very soft, handle it gently and make sure the center is cooked through before serving.
What to Serve With Cheeseburger Bombs
These savory bites work well as a snack, appetizer, or casual main meal.
- Creamy burger sauce: Complements the beef and melted cheese.
- Crispy potato wedges: Add a satisfying crunch to the meal.
- Fresh garden salad: Provides a light, refreshing contrast.
- Cucumber and carrot sticks: Add freshness and color to a snack platter.
- Corn salad: Brings a little sweetness to the plate.
- Tomato ketchup or mustard: Simple dipping options for guests with different tastes.
For parties, arrange the bombs on a platter with small bowls of dipping sauce. Serve them warm so the cheese remains soft and flavorful.
Frequently Asked Questions
1. Why Are My Cheeseburger Bombs Leaking Cheese?
Cheese may leak if the dough is too thin, the filling is excessive, or the seams are not properly sealed.
Use small cheese cubes, leave enough dough around the filling, and pinch the edges firmly before baking.
2. Can Refrigerated Pizza Dough Be Used Instead of Biscuit Dough?
Yes. Pizza dough is a suitable alternative and creates a slightly chewier outer layer.
Divide the dough into 12 equal portions and follow the same filling and sealing process. Baking time may vary depending on the dough thickness and brand.
3. Can These Cheeseburger Bombs Be Made in an Air Fryer?
Yes, if the dough balls fit comfortably in the basket with space between them.
Air-fry at approximately 350°F (175°C), checking after about 8 minutes and continuing until the dough is golden and cooked through. Exact timing depends on the appliance and dough type.
4. How Do You Keep the Beef Filling Juicy?
Use ground beef with some fat, avoid overcooking, and drain only the excess grease.
Adding a small amount of finely chopped pickle can improve the cheeseburger flavor, while keeping the filling relatively dry helps protect the dough.
5. Can the Cheese Be Replaced With Another Variety?
Yes. Mozzarella, mild cheddar, or a suitable burger cheese can be used.
Choose cheese that melts well and cut it into small pieces that fit easily inside the dough.
6. Are Stuffed Beef Cheeseburger Bombs Halal-Friendly?
They can be made halal-friendly by using suitable ground beef, cheese, dough, butter, and seasonings.
Check packaged products for unsuitable ingredients, including alcohol-containing flavorings or animal-derived additives that do not meet your requirements.
7. Can Vegetables Be Added to the Beef Filling?
Yes. Finely chopped mushrooms, onions, or bell peppers can add flavor.
Cook vegetables first if they release moisture, then let them cool before mixing them with the beef. A dry filling is easier to seal inside the dough.
8. Why Is the Dough Raw in the Middle?
The bombs may be too large, the oven may not be fully preheated, or the temperature may be too high for the dough to cook evenly.
Make smaller, evenly sized portions and bake until the outside is golden and the center is fully cooked. If the tops brown too quickly, cover them loosely with foil.
9. Can the Dipping Sauce Be Made Without Mayonnaise?
Yes. Plain Greek yogurt can replace the mayonnaise for a tangier, lighter sauce.
The result will be less rich than traditional burger sauce, but it still pairs well with the savory beef and melted cheese.
10. How Many Cheeseburger Bombs Should Be Served Per Person?
For an appetizer, plan on two or three small bombs per person alongside other snacks. For a main meal, three or four larger bombs may be suitable, depending on appetite and side dishes.
Adjust the portion size according to the size of the dough balls and the other food being served.
Conclusion
Stuffed Beef Cheeseburger Bombs are a delicious way to enjoy the familiar taste of a cheeseburger in a soft, golden, cheesy package. Each bite combines savory seasoned beef, melted cheese, tender dough, and a flavorful dipping sauce.
The recipe is simple enough for beginners and flexible enough for busy weeknights, family gatherings, or party platters. With a few everyday ingredients and an easy filling-and-folding method, a batch of warm, satisfying snacks can be ready without complicated preparation.
Serve them fresh from the oven with creamy burger sauce, crispy potato wedges, or a simple salad. For extra convenience, prepare the beef filling ahead and assemble the bombs when needed.
Try these Stuffed Beef Cheeseburger Bombs for the next family meal or gathering and enjoy a homemade snack with a golden crust, juicy center, and plenty of cheesy flavor.