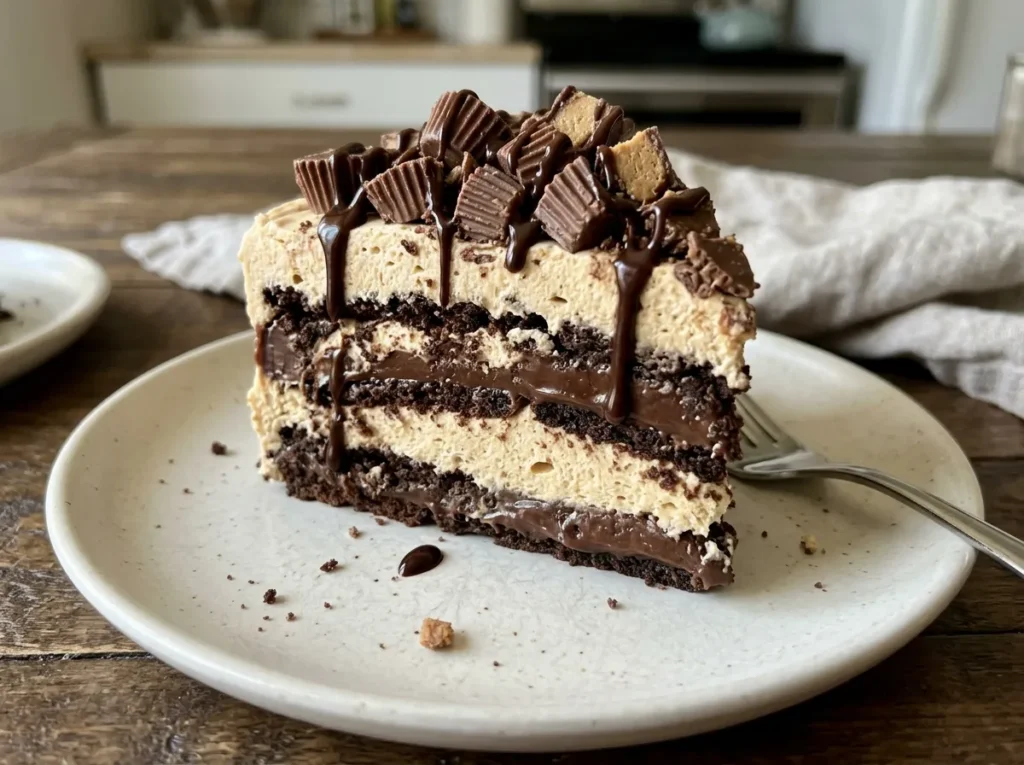
Imagine layers of soft chocolate cookies, fluffy peanut butter cream, rich chocolate pudding, and chopped peanut butter cups coming together in one irresistible dessert. Every bite is creamy, chocolatey, nutty, and delightfully smooth, with no oven required.
Peanut Butter Cup Icebox Cake is a simple no-bake dessert made by layering cookies, peanut butter filling, chocolate pudding, and peanut butter cups in a dish. After a few hours in the refrigerator, the cookies soften and absorb moisture from the creamy layers, creating a cake-like texture that slices beautifully.
This dessert is perfect for busy home cooks, beginner bakers, summer gatherings, birthday parties, and family celebrations. It looks impressive on the table but requires very little hands-on preparation.
The best part? There is no complicated baking process, no cake batter to prepare, and no need for special decorating skills. A few easy steps turn everyday ingredients into a chilled chocolate peanut butter dessert that tastes like a frozen peanut butter cup transformed into a creamy layered cake.
Ingredients
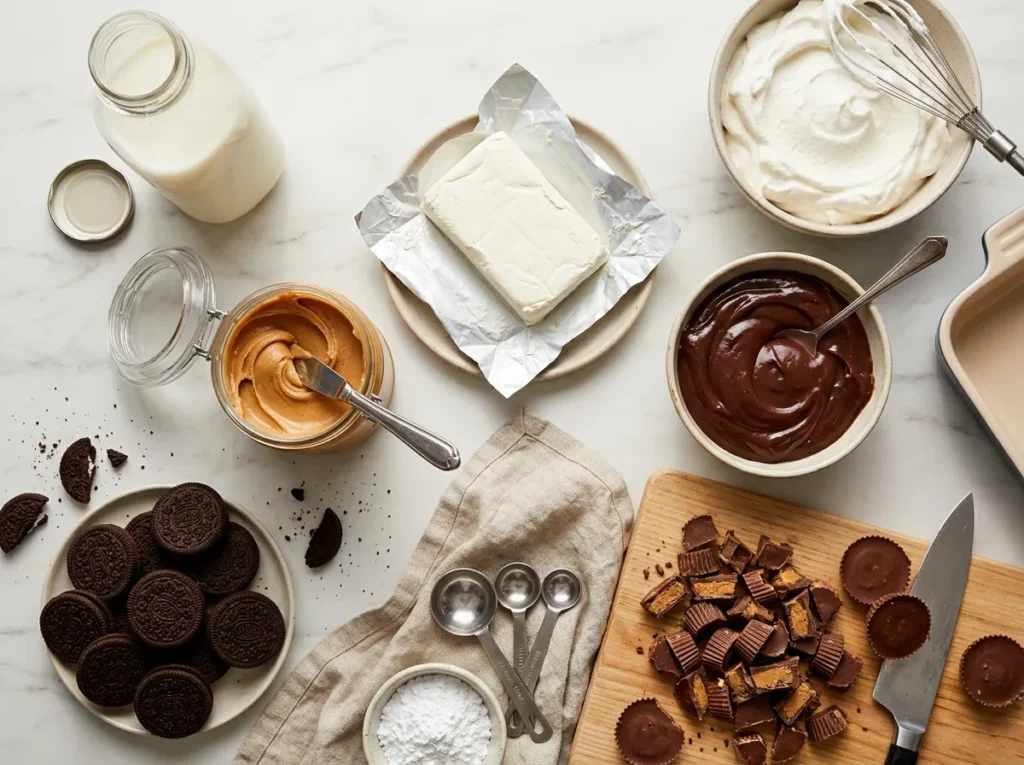
The ingredients for this chocolate peanut butter icebox cake are easy to find at most grocery stores. Choose smooth peanut butter, instant chocolate pudding, and cookies that soften nicely in the refrigerator.
For the Peanut Butter Cream
- 8 ounces (225 g) cream cheese, softened
- 1 cup (250 g) creamy peanut butter
- 1 cup (120 g) powdered sugar
- 1 teaspoon pure vanilla extract
- 2 cups (480 ml) cold heavy whipping cream
For the Chocolate Pudding Layer
- 2 packages (3.4 ounces or 96 g each) instant chocolate pudding mix
- 3 cups (720 ml) cold milk
For the Cookie Layers
- 24–30 chocolate wafer cookies or chocolate sandwich cookies
- 1 cup (170 g) chopped peanut butter cups, made with halal-friendly ingredients
For the Topping
- 1 cup (170 g) chopped peanut butter cups
- 2 tablespoons chocolate syrup, made with alcohol-free ingredients
- 2 tablespoons finely chopped roasted peanuts (optional)
Ingredient note: Check packaged cookies, pudding mix, vanilla extract, chocolate syrup, and peanut butter cups for alcohol-derived ingredients or other ingredients that do not meet your halal requirements. Use a verified alcohol-free vanilla flavoring if needed. Choose certified halal products when available.
Tools and Equipment
- One 9 × 13-inch (23 × 33 cm) baking dish
- Large mixing bowl
- Medium mixing bowl
- Electric hand mixer or stand mixer
- Whisk
- Silicone spatula or large spoon
- Measuring cups and spoons
- Sharp knife and cutting board
- Plastic wrap or an airtight cover
How to Make Peanut Butter Cup Icebox Cake
This Peanut Butter Cup Icebox Cake comes together in a few straightforward stages. Prepare the creamy filling, mix the chocolate pudding, assemble the layers, and let the refrigerator do the rest.
Step 1: Prepare the Peanut Butter Cream
Place the softened cream cheese in a large mixing bowl. Beat with an electric mixer until smooth and free of lumps.
Add the creamy peanut butter, powdered sugar, and vanilla flavoring. Beat again until the mixture looks thick, smooth, and evenly combined.
In a separate chilled bowl, whip the cold heavy cream until stiff peaks form. The cream should hold its shape when the beaters are lifted.
Gently fold the whipped cream into the peanut butter mixture using a spatula. Work slowly to keep the filling light and fluffy.
Step 2: Make the Chocolate Pudding
Pour the cold milk into a medium mixing bowl. Add both packages of instant chocolate pudding mix.
Whisk for about 2 minutes, or follow the package directions if they specify a different mixing time. The pudding should become thick and glossy.
Let it stand briefly until it reaches a spoonable consistency. Avoid allowing it to become so firm that it is difficult to spread.
Step 3: Arrange the First Cookie Layer
Place a single layer of chocolate wafer cookies across the bottom of the baking dish.
Break a few cookies into smaller pieces to fill any gaps. A mostly even layer helps the finished dessert hold together when sliced.
If using chocolate sandwich cookies, keep the cream filling intact. There is no need to scrape it out.
Step 4: Spread the Peanut Butter Filling
Spoon half of the peanut butter cream over the cookie layer.
Spread it gently with a spatula, reaching the edges and corners of the dish. Sprinkle about half of the 1 cup of chopped peanut butter cups over the filling.
The chopped candy adds little pockets of sweet peanut butter and chocolate throughout the cake.
Step 5: Add the Chocolate Pudding
Spread half of the prepared chocolate pudding over the peanut butter cream and chopped candy.
Use a spatula to create an even layer without pressing too hard. The goal is to keep the layers distinct while ensuring each cookie has enough moisture to soften.
Step 6: Repeat the Layers
Add another layer of chocolate cookies, breaking a few as necessary to cover the surface.
Spread the remaining peanut butter cream over the cookies, followed by the remaining chocolate pudding.
Finish with the remaining chopped peanut butter cups. Reserve the additional 1 cup of chopped candy for the final topping.
Step 7: Decorate the Cake
Drizzle the chocolate syrup over the top in thin lines.
Sprinkle the remaining chopped peanut butter cups over the surface. Add the optional chopped roasted peanuts for a little extra crunch.
For a neater presentation, distribute the toppings evenly rather than piling them in one spot.
Step 8: Chill Until Set
Cover the dish tightly with plastic wrap or an airtight lid. Refrigerate for at least 6–8 hours, preferably overnight.
This resting time allows the cookies to soften and the creamy layers to firm up. The result should be rich and spoonable, with enough structure to cut into neat squares.
For the cleanest slices, use a sharp knife and wipe the blade between cuts. Keep the cake refrigerated until it is ready to serve.
Tips and Variations
Choose the Right Cookies
Chocolate wafer cookies create a smooth, cake-like texture once chilled. Chocolate sandwich cookies make the dessert sweeter and slightly richer.
Graham crackers can also work, although they create a different flavor and texture. If using thicker cookies, allow extra chilling time so they soften properly.
Use Creamy Peanut Butter
Regular creamy peanut butter blends smoothly into the filling and creates a consistent texture.
Natural peanut butter that separates easily may make the filling oily or loose. If using natural peanut butter, stir it thoroughly before measuring and choose a variety with a consistency suitable for mixing.
Soften the Cream Cheese Properly
Cold cream cheese can leave small lumps in the filling. Let it sit at room temperature for approximately 30–45 minutes before mixing.
Beat it until smooth before adding the peanut butter. This simple step helps create a silky, even filling.
Keep the Whipped Cream Fluffy
Use cold heavy whipping cream and a chilled mixing bowl if possible. Whip until stiff peaks form, but stop before the cream becomes grainy.
Fold the whipped cream into the peanut butter mixture gently. Overmixing can remove the airy texture that makes the filling light.
Make It Less Sweet
Choose unsweetened chocolate wafer cookies and use a dark chocolate pudding mix. Avoid adding extra syrup, and reduce the candy topping slightly if desired.
Powdered sugar can be reduced modestly to suit personal taste, although the filling may become less sweet and slightly less structured.
Try Different Chocolate Layers
Milk chocolate pudding produces a mellow, sweet flavor, while dark chocolate pudding offers a deeper cocoa taste.
For an even more chocolate-forward dessert, use dark chocolate shavings instead of some of the chopped peanut butter cups.
Make Individual Dessert Cups
Layer the cookies, peanut butter cream, chocolate pudding, and candy pieces in small serving glasses or dessert cups.
Individual portions are convenient for parties and make serving easy. Use smaller cookie pieces to fit the glasses, and refrigerate them until firm.
Avoid These Common Mistakes
- Skipping the chilling time: The cookies need time to soften, and the layers need time to set.
- Using warm pudding: Allow freshly prepared pudding to thicken before assembly.
- Overwhipping the cream: Stop when stiff peaks form to avoid a grainy filling.
- Making the layers too thick: Spread each layer evenly so the dessert holds together.
- Adding toppings too early when crunch matters: For extra-crispy peanuts or candy decorations, reserve some toppings until shortly before serving.
Storage and Serving
How to Store Leftovers
Cover the cake tightly and store it in the refrigerator. For the best flavor and texture, enjoy it within 3–4 days.
Because this dessert contains dairy, it should not sit at room temperature for more than 2 hours, or 1 hour when the temperature is above 90°F (32°C).
Return any leftovers to the refrigerator promptly after serving. Use a clean serving utensil to help maintain freshness.
Can Peanut Butter Cup Icebox Cake Be Frozen?
Yes. Freeze the cake in a freezer-safe, tightly covered container for up to 2 months for best quality.
For easier serving, cut it into individual squares and freeze them in a single layer until firm. Wrap each portion well, then transfer it to a freezer-safe container.
Thaw the portions in the refrigerator before serving for a softer, creamier texture. Alternatively, serve them slightly frozen for a firmer, ice-cream-like consistency.
The texture may change slightly after freezing, particularly if the cookies absorb a lot of moisture. Keep the dessert covered to reduce freezer burn.
Best Ways to Serve It
Serve chilled squares on small dessert plates with a fork or spoon. The contrast between the soft cookies, fluffy peanut butter filling, and rich chocolate pudding makes every bite satisfying.
For a simple finishing touch, add a little chocolate drizzle or a few chopped peanuts just before serving.
This cake pairs well with fresh strawberries, banana slices, or a cup of coffee or tea. Fresh fruit adds a refreshing contrast to the rich chocolate and peanut butter flavors.
For a party, cut the cake into smaller squares so guests can enjoy a sweet treat without needing a large portion.
Frequently Asked Questions
1. Can Peanut Butter Cup Icebox Cake Be Made the Day Before?
Yes. Preparing it the day before is ideal because the cookies have plenty of time to soften and the layers become easier to slice. Keep the dish covered in the refrigerator until serving.
2. Why Is My Icebox Cake Too Soft?
A cake that is too soft may not have chilled long enough, or the pudding and cream layers may have been too loose during assembly. Refrigerate it for several more hours before cutting. For future batches, follow the pudding package directions and whip the cream to stiff peaks.
3. Can This Dessert Be Made Without Cream Cheese?
Yes. Replace the cream cheese with an equal amount of thick, full-fat mascarpone if a suitable halal-friendly product is available. The filling will have a slightly different flavor and texture. Make sure the substitute is well chilled before mixing.
4. Can Store-Bought Whipped Topping Be Used?
Yes. A suitable non-dairy whipped topping can replace the homemade whipped cream, provided it meets your dietary requirements. Follow the product’s instructions and fold it gently into the peanut butter mixture. The final texture may be sweeter and less rich.
5. Can Crunchy Peanut Butter Be Used?
Absolutely. Crunchy peanut butter adds small pieces of peanuts throughout the creamy filling. The cake will have a little more texture, although smooth peanut butter generally produces a more uniform result.
6. How Do You Cut Clean Slices?
Chill the cake overnight and use a sharp knife. Dip the knife in warm water, wipe it dry, and cut straight down through the layers. Clean the blade between slices for a neater presentation.
7. Can Gluten-Free Cookies Be Used?
Yes. Choose gluten-free chocolate wafer cookies or another suitable gluten-free cookie. Check the pudding mix, candy, and other packaged ingredients for gluten cross-contact or other relevant dietary restrictions. Allow enough chilling time for the alternative cookies to soften.
8. Does This Icebox Cake Need to Be Baked?
No. This is a completely no-bake dessert. The cookies soften in the refrigerator as they absorb moisture from the pudding and cream layers, creating a cake-like texture without an oven.
9. Can the Chocolate Pudding Be Replaced?
Yes. Vanilla pudding creates a sweeter, creamier flavor, while chocolate fudge pudding gives the dessert a deeper chocolate taste. Prepare the replacement according to its package directions and let it thicken before layering.
10. How Long Should the Cake Sit Out Before Serving?
Serve it straight from the refrigerator for the best structure. If the cake is very firm, let it stand for about 5 minutes before slicing. Avoid leaving it out for extended periods because the dairy-based filling needs to stay cold.
Conclusion
Peanut Butter Cup Icebox Cake is proof that an impressive dessert does not need to involve complicated baking techniques or hours in the kitchen. With layers of chocolate cookies, fluffy peanut butter cream, smooth chocolate pudding, and sweet peanut butter cups, this chilled treat delivers plenty of flavor with minimal effort.
It is easy enough for beginner cooks and special enough for birthdays, potlucks, family dinners, and holiday gatherings. Preparing it ahead of time also makes entertaining less stressful, leaving more time to enjoy the occasion.
For the best results, assemble the layers evenly, allow plenty of time for chilling, and finish with a generous sprinkle of chopped peanut butter cups. Each slice offers a delicious combination of creamy, soft, rich, and chocolatey textures.
Give this Peanut Butter Cup Icebox Cake a try the next time a simple, crowd-pleasing dessert is needed. Cut it into squares, serve it chilled, and enjoy every delicious bite.